Switch Panel Options
As a highly customizable product, we have tons of options. This guide will walk you through them to make an informed decision.
Read it all or jump to what you need with these buttons:
1. Switch Type
The first decision is what type of switch do you want. All options are marine grade and waterproof. The primary concern here is aesthetics.
The type of switch can also have a fairly dramatic impact on the overall cost of the panel.
Etched Rocker

Printed Rocker

Toggle

Push Button

Pros:
- Night Readable (see how)
- Customizable labels
- Easy to Change Labels
- Flexible Position Options
Cons:
- More expensive than printed rockers
Pros:
- Least Expensive
- Easy to Change Labels
- Flexible Position Options
Cons:
- Not night readable
- Limited label options (view options)
Pros:
- Any voltage (12Vdc – 48Vdc)
- Any label possible
- Flexible Position Options
Cons:
- Panel etching means can’t change labels
- No built-in indicator light
Pros:
- New/Modern appearance
- Built-in circuit protection
Cons:
- Most Expensive
- Limited positions available
- Panel etching means can’t change labels
2. Rocker Switch Lighting Colors
Rocker Switches are by far the most popular. If you’re looking for either etched or printed rockers (read about the difference here), then you have one more choice:
Etched Rockers Can Have:
1. White lights
2. Blue Lights
3. Red Lights
White is the most popular, and the least expensive.
Printed Rockers Can Have:
1. Red Lenses
2. Blue Lenses
Does not impact the cost, just personal color preference.

A Note on Etched Switch Lighting Intensity:
With our etched covers, the white, blue or red color is achieved by using different light colors in the switch, not a tinted lens like a printed rocker. White are incandescent lamps, while blue and red are LEDs. Something to keep in mind is the lighting intensity:
- Blue – Quite bright. We recommend a dimmer if you’ll be using them at night and the switches face towards your eyes
- White – Nice middle ground, indicators visible during the day. Not overly bright at night
- Red – Least bright of all. Nearly impossible to see indicators in direct sunlight. Recommended for heavy nighttime use

(Click to Enlarge)
3. Switch Positions
We’ll need to know the positions/functions of each switch. This will slightly impact the overall cost.
The options are:
(ON) here represents a momentary function.
- ON-OFF
- (ON)-OFF
- ON-OFF-ON
- (ON)-OFF-(ON)
- ON-ON
- ON-OFF-(ON)
Note, only ON-OFF, and (ON)-OFF is available with push-button switches (with some exceptions).
4. Circuit Breakers
Our most popular option – and for good reason. Some kind of branch circuit protection is a must-have for a boat. This is usually achieved one or two ways:
- Fuse block under the dash, or:
- Circuit breakers in the panel
Circuit breakers have a number of advantages:
- Easy to reset
- Don’t have to carry/find spare fuses
- MUCH easier to install the panel
We can’t over emphasis how much easier it is to install one of our panels with circuit breakers. It’s the most plug and play options we have, and allows us to do much more pre-wiring on our work benches.
Without breakers, you have to deal with literally twice the number of wires to the panel (2 vs. 1 per switch). It will save lots of install time, and they are not much more expensive in most cases than a fuse block anyway.

5. Accessories
Two more popular items are:
We use marine-grade versions with quality rubber seals for the 12V, and IPX4 Waterproofing technology for the USB-C.
Two ports are included with our USB chargers – a USB-C and a USB-A, with 6A total capacity.

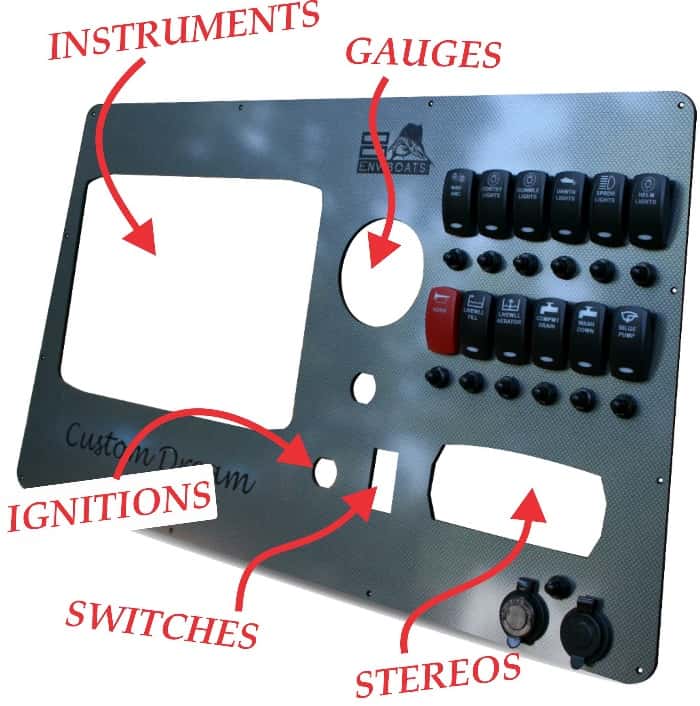
6. Holes
It’s very common for us to design a complete dash panel. While we don’t stock gauges, stereos, and nav instruments we can certainly design your panel for them!
It’s really nice to have your MFD display hole precision cut by our CNC machines versus trying to follow a template with your jigsaw.
Types of common holes include:
- Gauges (2 1/8″, 3 3/8″, round, etc)
- Instruments (Garmin, Simrad, Furuno, etc)
- Stereos
- Ignition & kill switches
- Empty switch or breaker holes
This is one point where we do need assistance from you. Please measure! The last thing we want to do is cut the wrong size hole, and your beautiful brand new switch panel needs to be shipped back and rebuilt because of a 1/4″ measuring error.
(Click to Enlarge)
7. Graphics & Backlighting
Another popular option is for us to engrave a graphic into your panel.
The boat brand can make a panel look even more OEM. Or the name of your boat can give your panel a truly customized feel.
We’ve invested in the technology and machines to perform etchings quickly and affordably with laser engraving technology, not screen printing. This also means your graphic will not wear off.
For push-button switches, toggle switches, and breaker panels we’ll also use this technique to etch the switch labels into the panel.


On some materials we can also backlight your graphics or engraved text, which really looks spectacular.
It’s very common when using push button switches to have matching text backlighting.
Backlighting is a fairly pricey option. At around $10 per square inch, most people don’t spring for very large graphics. Nor would we recommend it! A small tasteful graphic, somewhere around 1″ x 3″ looks great. Trust us, even a small backlit boat name will draw your guest’s attention.
8. Material Color
We have a variety of material laminate options available, all on ruggedized UV resistant ABS plastic.
Standard black, and black carbon fiber are our most popular.
We have an entire page with details and suggestions regarding panel material choices here.

(Click to Enlarge)
9. Wiring Options
We have three wiring package options. These do impact the price quite a bit, but MAN does it also impact the time you’re going to spend installing it.
No Wiring
Please don’t try this at home unless you know what you’re doing. If you don’t know that terminal 2 is always an input, that terminals 4 and 6 aren’t linked to the dependent lamps, and terminal 7 is always a negative… then let me, help you… and don’t try it.
That being said, we can provide wiring diagrams, and if you’re looking to cut costs as much as possible, it is an option.
Jumpers Only
Jumpers are tedious, technical and in abundance on a switch panel.
This is a good option if your new switch panel is going right back in the same place as the old panel, and you know you have enough slack in your existing wiring to reach each new switch.
See the open terminal on each of these rockers? That’s where you’ll plug into it.
Fully Wired
Our most popular package because it’s as turn-key as possible. You never have to touch a terminal on any switch (when breakers are included).
A 2ft pigtail harness is standard, but we can go longer if you need to. Each wire is labeled with a heat shrink label telling you exactly where to put it.
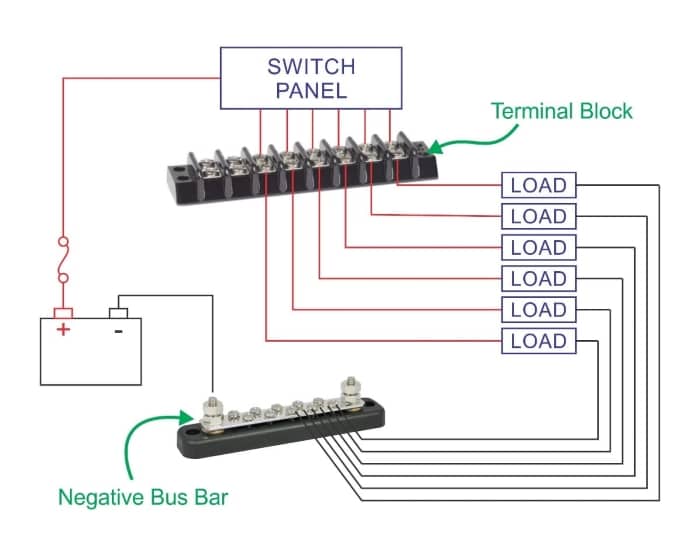
A ring terminal is applied to the end of each wire, which is meant to land on a terminal block like this one.

More on Fully Wired
Here’s a picture of how a fully wired panel would connect to a terminal block. The OUTPUT ( switch leg) leads are shown here. A terminal block is very useful, it allows:
- Easy to ID circuits with our heat shrink ID labels
- Convenient place to place multiple loads on one switch (ex: multiple courtesy lights)
- Breakout point for troubleshooting issues w/ voltmeter
To use our harness the way it’s intended, you’ll need to crimp ring terminals onto your load wiring harness, and land them onto the adjacent lead for each load respectively.
Mouse over the image to see a simplified wiring diagram.

A Note on Panels without Breakers
We recommend having circuit breakers for each load in the panel. Sometimes however there’s no room, or other constraints prevent that. In this case, our standard wiring package is to provide the OUTPUT leads only. The input leads would be customer installed from the fuse block. If input leads are desired, please let us know in advance.
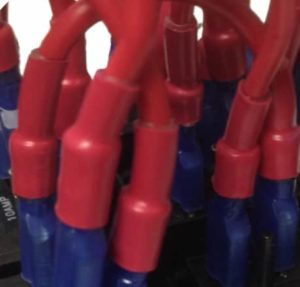
10. Heat Shrink
We can apply adhesive-lined heat shrink to all connectors. This protects from water sitting in the almost-cup-like ends of the connectors, and eventually damaging the wire.
We do recommend heat shrink to extend the life of your panel and electrical system. It is a bit of a price driver though because – as you can imagine – it’s very time-consuming to shrink all those connections.
Roughly two-thirds of our customers opt for heat shrink. We can certainly get you a quote both ways.
11. More?
As a completely custom product, we can accommodate many requests for items not listed here. Contact us if there’s anything you’d like that you don’t see here, and we’ll see what we can do.
Where to go from here?
Now that you know all your options, let’s get started! Get in touch and let’s start the process of making your new custom dash panel a reality!