
Wiring Upgrades for Any Boat
Whether you find yourself sitting in the console of a brand new boat or in the console of the Facebook Marketplace fixer-upper, there’s a strong chance you’re staring at a mess of wires thinking, “CAN I EVEN CLEAN THIS UP?!”
Not to fear… We have the answers and solutions for you!
Before we jump in, we strongly recommend making sure you have a decent basis of how the wiring in your boat works. Check out our Boat Wiring Basics page (HERE) to learn more.
We’ll start with our favorite solution…
1. A Fully Wired Switch Panel from New Wire Marine
If you’ve explored our website or social media, you’ve probably seen some really cool before and after photos, especially for bigger projects/bigger boats. But you don’t have to be cruising on a 42 to reap the benefits of our custom panels!
We design and build switch panels for boats of ANY and EVERY size. Hell, we even build panels for tow trucks, fire trucks, RVs, humvees, and so much more.
If you need a custom panel and want the wiring done right, we’re your go-to folks. Just check out the variety of the work we do!


Decided to skip the rest of this article and start fresh with a New Wire panel?
We can’t wait to work with you! Get started now by Requesting a Quote!
No-go on the custom panel, for now? Here are the rest of our suggestions to get your wiring cleaned up.
2. Breaker Blocks and Fuse Blocks
Circuit protection… it can be a monster sometimes, but it is VITAL to the functioning of your boat. We won’t get in-depth on why circuit protection matters as whole, but you can learn more on that HERE.
Let’s quickly break down the differences between breakers and fuses.
HERE’S WHAT THEY HAVE IN COMMON…
- Both provide circuit protection, which is ABSOLUTELY necessary (unless you’re trying to set your boat on fire… in that case, PLEASE leave us out of that).
- Both can be used interchangeably. I.e. you can have both breakers and fuses on your boat safely.
- When ordered online from NWM, both come with sticker labels to easily ID each breaker or fuse as well as mounting studs. We like to use our heat shrink labels in place of the stickers, but the stickers are a great (included) option!
…
…AND HERE’S WHERE THEY DIFFER:
(see the Why Circuit Protection Matters page (mentioned above) for a more in-depth comparison):
Circuit Breakers
- Designed to interrupt current flow, tripping when surged
- Need to be manually reset
- Primary benefit: They do not need replacement after tripping, as they are reusable; they only need to be reset.
Fuses
- Designed to destructively fail when it reaches a set amount of current running through it
- When a fuse blows (aka fails), it’s permanently destroyed and needs to be replaced
- Primary benefit: Generally less expensive than breakers
Okay, now that you know the basics on breakers vs. fuses, let’s talk BLOCKS.
Breaker Blocks
Available in 6 gang and 12 gang, these house your CMB-style breakers in a singular, secure block with a sturdy plastic cover.
What we love about the cover: Aside from its rigidity, this easy to remove, thumb screw cover also features small, flexible-silicone bubbles over each breaker button – which means you don’t have to remove the cover to reset!
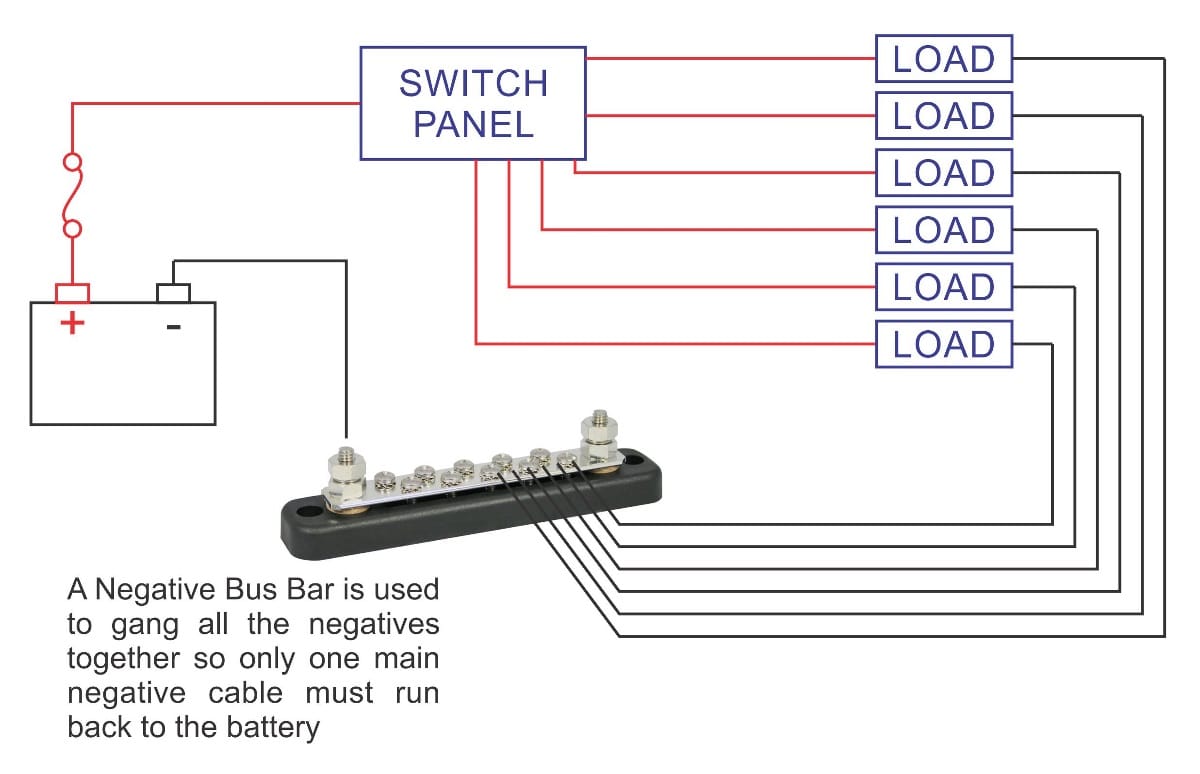
These beauties also house a negative bus bar! We’ll talk more on those in a minute, but they are the easiest and best way to gang your grounds (negatives) together. The 6 gang breaker block has 6 negatives and the 12 block has 12, all which attach with #8 ring terminals.
Lastly, our breaker blocks feature positive and negative feeder studs on their respective ends.
To provide power to your panel, attach your battery input lead (+) to the positive stud using a #10 ring terminal.
To run your negatives from the panel back to the battery, we recommend securing the panel ground to the breaker block’s bus bar and then running that ground (plus any others your attach) out to the battery using the (-) #10 feeder stud.
P.S. – We linked to our heat shrink connectors because they are the BEST. Yes, they may be a bit pricier than the non-heat shrink, but they are worth every penny in protection and wire security.

Fuse Blocks
We offer several different styles of fuse blocks, but our most popular are our 6 circuit and 12 circuit fuse blocks.
These ATC-style fuse blocks are designed very similarly to our breaker blocks in that they house your fuses, providing circuit protection for your switch panel. They also feature the same (-) and (+) #10 studs to feed power in and grounds out.
Another cool feature – these fuse blocks have 2 holding spaces for spare fuses inside the cover!

Products we recommend when using any of our Fuse Blocks or Breaker Blocks:
Heat Shrink Labels to easily identify wire leads
#8 14-16 AWG Ring Terminals (Heat Shrink)
#10 10-12 AWG Ring Terminals (Heat Shrink)
3. Terminal Blocks


We can’t say enough good things about terminal blocks. Seriously… if you aren’t already using these, ORDER THEM and see so many of your wiring problems disappear!!
…
Essentially, terminal blocks break circuits out – making them neater, easier to follow, and ultimately safer for your electrical system.
…
Plus, they’re as simple to use as they look…
- One side of the terminal block will be where you attach your output leads coming off the panel.
- On the other side of the terminal block, attach the corresponding lead coming from your component.
…
…And VOILÀ!
you’ve got clean, easily-accessible termination for everything your switch panel controls!
Not to sound like a Billy Mays commercial, but just when we think we’ve found all the creative ways to utilize terminal blocks… THERE’S MORE!
Dimmer Kits
At the end of 2022, we launched our Contura V and Contura XIV Dimmer Kits.
These kits include everything you need to start dimming, but we made use of a tiny 4-gang terminal block within those kits!
The terminal block, along with the included terminal block jumper, allows the dimmer kit to operate your panel/switch backlighting, plus 3 lights (or more, if you decide to stack ring terminals) you have on board!

Products we recommend when using our Terminal Blocks:
Heat Shrink Labels to easily identify wire leads
#8 14-16 AWG Ring Terminals (Heat Shrink)
Final Thoughts on Terminal Blocks:
- We consider them a must-have in any boat, and a must-have when ordering a custom switch panel through us.
- If you’re ordering a fully wired panel from us and opt for a terminal block (great choice), we recommend asking your project manager for a duplicate set of heat shrink labels. That way, when your panel arrives and is ready for install, you’re able to label all the leads from your boat.
- Check out our terminal blocks to learn more about them
4. Bus Bars
We carry quite a few different bus bars, but we’re going to focus on the bus bars we use for our panels – the 10 circuit and 20 circuit bus bars.
While we typically use these for ganging grounds, they can also be used for ganging positives!
…

We also call these “10 gang” or “20 gang” bus bars because you’re “ganging” all the connections together to be run back to the battery. The concept is simple, but these compact bars make a huge difference in your wiring set up.
…
HOW THEY WORK:
- Use #8 ring terminals to secure each negative lead (or positive, but NEVER attach both to the same bus bar) under the studs.
- Then, use a #10 ring terminal to run the grounds back to the battery (again… or positive, but NEVER TOGETHER ON ONE BUS BAR)
When using these for bussing POSITIVE leads…
Make sure the leads you’re attaching pass through circuit protection before you gang them all together. Otherwise, you’re looking at an electrical fire!
…
A GOOD EXAMPLE:
Let’s say you have multiple breaker blocks on your boat. Using a bus bar, you can gang the positive feeder leads coming off the breaker blocks together – nearby where they’re located – and then run one, singular (lower gauge) wire back to your battery for those breaker blocks.
You can also link/”jump” multiple bus bars to one another, so as to not overcrowd one with too many stacked connections. Do this by linking the #10 feeder studs together.
…
NOTE: Make sure you’re using the appropriate gauge wire (we typically use 6 or 8 AWG) on the #10 end studs. Another recommendation – don’t add more than 5 extra connections than what it’s designed to hold. So if you’re using the 10 gang, don’t put more than 15; for the 20 gang, don’t put more than 25.
Products we recommend when using our Bus Bars:
Heat Shrink Labels to easily identify wire leads
#8 14-16 AWG Ring Terminals (Heat Shrink)
#10 10-12 AWG Ring Terminals (Heat Shrink)
Final Thoughts on Bus Bars:
- We consider these as another “must have” for your sanity and your boat’s electrical safety
- Capable of using them to gang positives OR negatives to be run back to the battery. (*in unison* “but NEVER TOGETHER”)
- Bus bars are VERY different from terminal blocks, as all leads on bus bars are connected to one another by the corrosion-resistant tinning. Learn more on their differences HERE
5. Battery Switch Mounts

These Recessed Battery Switch Mounts are our newest addition to help combat wiring messes – and they’ve been designed and engineered completely in-house by our engineering team.
…
We offer them in black and in white, available either as a blank or with any of our in-stock battery switches/battery combines.
They were designed and revised over and over until our engineering team found the perfect depth for the recessed pocket – not so deep that you scrape your hands or fingers when turning the switch, but deep enough to protect the switch from any accidental knocking or turning.
…
One of the best parts?
These can be mounted into ANY thickness of fiberglass! They’re made out of UV-resistant King Starboard, so they will hold up very well under the summer sun.
The Recessed Battery Switch Mount provides easy access to your battery switch from outside the console while protecting the rear studs inside the console.
In addition, these mounts allow further elevation of your battery connections – protecting your boat’s electrical system in the case of water getting inside the console (assuming your batteries are also elevated).
…
Other Resources Mentioned in this Article:
…
We hope this article and the products mentioned help sort out your wiring headache!
Got further questions? We’re here to help! Give us a call at 843-297-8348 or send us an email at sales@newwiremarine.com.
Want to throw out your old switch panel and start fresh? We’re here for that, too! Start your custom panel process now:


Leave A Comment
You must be logged in to post a comment.